How to Mesh Wi-Fi Routers for Whole-Home Coverage

Setting up a mesh Wi-Fi system involves connecting a primary node to your modem and syncing secondary satellite units to eliminate dead zones. By replacing or expanding your traditional single-router setup, you create a unified wireless network with a single network name and password that covers your entire home.
Unlike traditional range extenders that cut your bandwidth in half, mesh routers communicate constantly with each other to route traffic efficiently. This guide walks you through the exact process of planning, connecting, and configuring your mesh network for maximum speed and reliability.
Planning Your Mesh Wi-Fi Placement
Before plugging in any hardware, map out where your primary router and satellite nodes will go. The primary node must sit next to your modem, usually where your internet service enters the house. Satellite nodes should ideally be placed no more than two rooms away from the primary node to ensure a strong backhaul connection.
Avoid placing nodes inside metal cabinets, behind large appliances, or right next to thick concrete walls. Obstructions degrade the wireless signal between nodes and reduce your overall network performance. By mapping your layout in advance, you prevent connection drops and ensure smooth roaming as you walk around your home with your devices.
Connecting the Primary Node to Your Modem
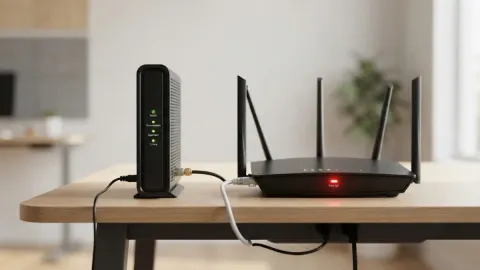
Start by unplugging both your modem and your new primary mesh router from power outlets. Take an ethernet cable and plug one end into the LAN port on your modem, and the other end into the WAN or Internet port on your primary mesh router. Once the physical connection is secure, plug your modem back into the wall outlet and wait about sixty seconds for it to fully boot up and establish an internet connection.
Next, plug your primary mesh router into a power source. Watch the LED indicator light on the router. It will typically flash different colors while booting up, then transition to a solid color once it successfully connects to the modem. If the light remains red or flashing, double-check your ethernet cable connections and restart both devices.
Configuring Your Network via Mobile App
Almost all modern mesh systems require a companion mobile application for initial setup and ongoing management. Download the official manufacturer app on your smartphone using cellular data if your home Wi-Fi is not yet active. Open the app and follow the on-screen prompts to create a new account or sign in to your existing manufacturer profile.
The app will automatically search via Bluetooth for your new primary router. Once it detects the device, you will be prompted to create your new Wi-Fi network name and a secure password. Make sure to write down your credentials or save them in a password manager. After the configuration completes, your primary node will broadcast your brand new mesh network.
Positioning and Pairing Satellite Nodes
With your primary node active and broadcasting, you can now set up your satellite nodes. Take the first satellite unit to its designated room and plug it into a standard wall outlet. The LED light on the unit will begin pulsing as it searches for the primary router. Keep an eye on the app, which will notify you when the satellite is within range and ready to pair.
If the LED turns solid blue or green, the pairing was successful. If the light turns red or amber, the satellite is too far away from the primary node. Move it closer until you achieve a solid connection. Repeat this process for any additional satellite nodes you have in your kit, testing the signal strength in each room as you go.
Testing and Optimizing Your Mesh Network
Once all nodes are powered on and connected, perform a speed test using your smartphone or laptop while moving through different areas of your house. Most mesh apps feature a built-in speed test tool that checks both your internet download speed and the internal connection speed between your nodes. This helps you identify any bottlenecks caused by distance or interference.
If you experience slow speeds in a specific corner, try shifting that satellite node a few feet in either direction or elevate it onto a shelf rather than leaving it on the floor. Keeping your mesh router firmware updated through the mobile app ensures optimal performance, security patches, and stable handoffs between nodes as your devices roam.
The bottom line
Mesh Wi-Fi routers provide an effective solution for eliminating dead zones and blanketing your entire home in fast, reliable internet. By carefully planning your node placement, connecting your primary hardware correctly, and fine-tuning your coverage through the companion app, you can enjoy seamless connectivity on all your devices.
Frequently asked questions
Do I need to turn off my modem's built-in Wi-Fi?
If your modem is actually a modem-router combo provided by your ISP, you should disable its wireless feature or put it into bridge mode to prevent interference with your new mesh network.
How many mesh nodes do I need for my house?
A standard two-pack usually covers homes up to 3,000 square feet, while larger multi-story homes or properties with thick walls may require a three-pack or more.
Can I mix different brands of mesh routers?
No, mesh routers from different manufacturers generally do not communicate with each other. You must use satellite nodes that match your primary router brand and model.
Should I connect my mesh nodes wirelessly or with ethernet?
Wireless backhaul is convenient, but if your home has built-in ethernet wall ports, using a wired backhaul between nodes provides the absolute fastest speeds and lowest latency.
Do mesh systems slow down internet speed?
Traditional extenders cut speeds in half, but modern tri-band mesh systems use a dedicated wireless channel for node-to-node communication, minimizing speed loss.